
PX UART Settings
The UART settings for the Brainboxes COM Port allow you to get the best performance from your device and system. There are two choices, dependant on whether minimal CPU usage or Data Latency (delay) is the main concern.
The default settings have been carefully selected and should provide great performance for the majority of users. The UART Settings will help if you need to lower the CPU usage, or your application is timing critical and requires a lower Data Latency.
Accessing UART Settings
-
Open the Port Settings (as described in Port Settings) and click the Advanced button.
-
Select the "UART Settings" tab.
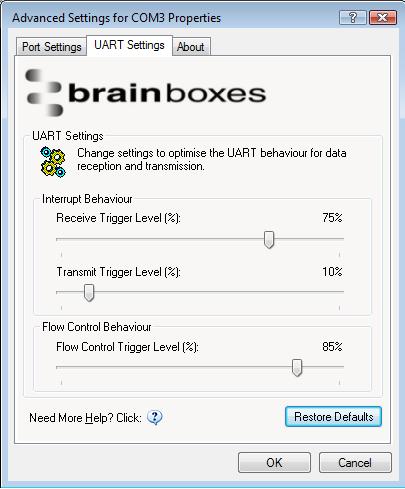
Receive Trigger Level
This slider allows you to choose how much incoming data is stored in the Receive FIFO before it gets processed by the driver.
Processing the data takes a small amount of CPU time, so doing this frequently will increase CPU Usage, but it will also decrease the latency at which data is delivered to the application. Choosing the right value is a trade-off between CPU Usage and Latency.
-
Low values result in a high number of interrupts, and therefore increased CPU Usage, as well as short latency times between the reception of the data by the UART chip and the delivery to the application.
-
High values have the opposite effect - lower CPU usage but higher latency.
If the Receive Trigger Level is chosen very high, and data is continuously streaming into the UART's FIFO, then this might result in data getting lost due to a FIFO Overrun. This is caused by the reaction time of the Operating System and driver to the interrupt. If this reaction time is longer than it takes to fill up the remaining space in the FIFO, then overrun can occur. To prevent this, choose a slightly lower Receive Trigger Level, and use Flow Control.
The slider allows choosing values from 1% to 100% of the Receive FIFO size.
Transmit Trigger Level
This slider allows you to choose when the Transmit FIFO is re-filled with data. If a low value is chosen, little or no data is left in the Transmit FIFO at the time of the re-fill. The higher the value, the more data will be in the FIFO.
Re-filling the Transmit FIFO before it runs empty has the advantage that the small processing time required to generate the interrupt notification to the driver and putting data into the FIFO will not have the effect of a gap appearing in the data stream on the transmission line.
It is not common to choose high values for this slider, as the potential transmission gap is easily bridged, even if values are chosen in the lower part of the slider. Higher levels increase the amounts of hardware interrupts generated, and hence increase CPU usage.
The slider allows choosing values from 0% to 100% of the Transmit FIFO size.
Flow Control Trigger Level
The slider only takes affect if any type of flow control was selected by the application that opened the COM port.
This slider allows you to choose when the flow control state changes (RTS, DTR, in-band flow control). If the amount of received data reaches the Flow Control Trigger Level, any active flow control mechanism is set to the "do not send" state. Once the amount of received data falls again below this level, all active flow control mechanisms are returned to the "send data" state.
Depending how handshaking is implemented on the device at the other side of the cable, it is possible that some data is still transmitted to our UART even after handshaking has been turned off. Setting very high Flow Control Trigger Levels might in this case result in a FIFO overrun, and hence the loss of data.
It is not common to choose low values for this slider, as this increases the amount of handshaking changes on the line. That might increase the processing overhead on the remote device, and result in gaps in the data stream, thus reducing data throughput. Usually values are chosen in the higher part of the slider.
The slider allows choosing values from 1% to 100% of the Receive FIFO size.
Restore Defaults
Pressing the "Restore Defaults" button will reset all settings on this Property Page to the factory defaults of this device.