How do I set up Push Notifications on the BB-400?
1. Summary
This FAQ gives examples with different methods for a user to use push notifications. Push notifications are simple notifications which a user can setup for when a specific event has happened. An example of this would be, if one of the BB-400 inputs signal high, immediately send a notification via email.
Push notifications are useful for notifying one or many users when a certain condition is met, whether it's when a signal has gone from low to high on one or many inputs, or if the count on a specific input is above a specific threshold. The condition is entirely yours to control.
2. Using Node-RED for Push Notifications
Node-RED Nodes used in this FAQ
| Node | Description |
|---|---|
| Inject, for specifying what type of message and the message itself for injecting. | |
| Debug, for debugging the returned data from the nodes it's attached to. | |
| WebSocket is used to establish connections to a WebSocket server. It can be configured to 'connection to' which is for establishing a static connection, or 'listen on' for only listening for responses. You will find the WebSocket node in both the INPUT and OUTPUT tabs in the palettes available. | |
| For converting read messages into a json object. | |
| Function, a JavaScript block to run against the messages being received and output as a msg object. | |
| Switch, for routing messages based on their property values or sequence position. | |
| Email, sends the msg.payload as an email, with a subject of msg.topic. | |
| Twitter, can send tweets and direct messages. |
Setup for Push Notifications
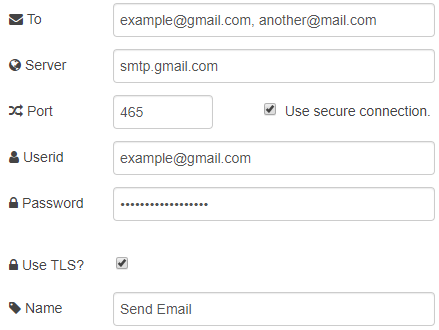
Node-RED comes with it's very own 'Email' node which is very simple in sending emails. It sends the msg.payload as an email, with a subject of msg.topic.
There's additional information which can be added to the msg, which can be used to set additional CC and BCC email recipients. Formatting the email is also available, as the payload can be written in html.
If the payload is a binary buffer then it will be converted to an attachment. The filename should be set using msg.filename. Optionally msg.description can be added for the body text.
Alternatively you may provide msg.attachments which should contain an array of one or more attachments in nodemailer format:
msg = {
    payload : "Alarm has been triggered at " + Date().toString(),
    topic : "Emergency Trigger!",
    to : "[email protected], [email protected]",
    cc : "[email protected]"
}
return msg;
Reading the IO lines
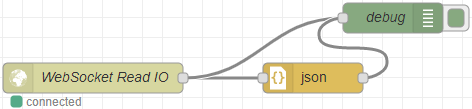
Firstly, set up a WebSocket connection to the localhost of the BB-400, to continuously monitor the IO lines. To do this, use a WebSocket input Node and configure it to monitor the WebSocket server on your BB-400:
Please make sure you have BB-IO-Server installed on your BB-400
 |
|---|
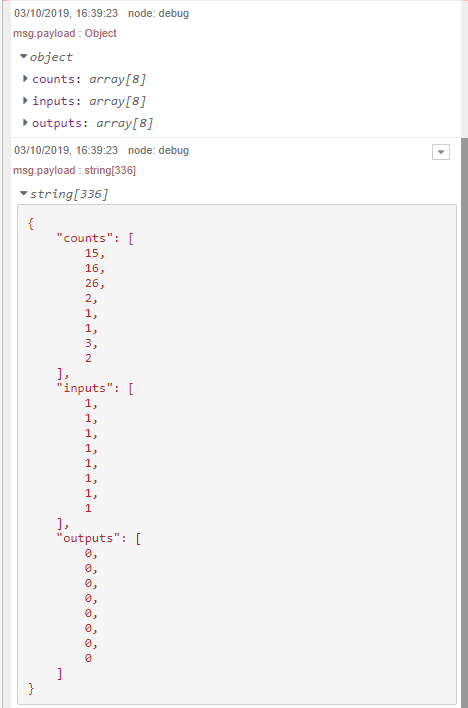
The default port number for the WebSocket server will be 8989. This can tested by setting up a debug node, and attaching it to the end. You will also need that json node, so this can also be attached to make sure the message being received is being converted into a json object:
Deploying the flow ![]() and viewing the debug tab on the right
and viewing the debug tab on the right ![]() will show the current state of the inputs, outputs and the counts:
will show the current state of the inputs, outputs and the counts:
Sample Scenarios
There's many different conditions which could be used for triggering push notifications. Common examples include when an input has gone from high to low, or if the counts exceeds a certain value.
This FAQ demonstrates how to configure both of these common examples using Function and Switch nodes. These nodes connect to your already setup WebSocket connection.
Monitor IO0 for when it goes from HIGH to LOW
Set up your function Node to select and return one specific IO line.
In this written example, it's checking whether IO line 0 is high or low, and returning true or false depending on its status:
![Function node code checking inputs[0] and returning true if high, false if low](/assets/images/function-2-8ebee7feb10eceac3a1a1c5399685e79.png) |
|---|
Next, set up a Switch Node, which will simply execute, depending on what condition has been returned from the attached Node:
 |
|---|
In this example, the end point will execute if the value returned is false (from the function node):
![]()
That's the condition finished at this point, so when we pull everything together, we have the following:
![Node-RED flow with WebSocket Read IO, json, debug, Monitor Input[0], and if (input=low) nodes](/assets/images/flow-2-7d4a01cdfe0f6401bca1b8b5fd9e3c26.png)
Monitor IO1 for when counts exceed 500
Set up your function Node to return the count value:
|
|---|
In this written example, it's getting the counts value for DIO line 1 and returning that value in the payload. Next, set up a Switch Node, which will simply execute depending what condition has been returned from the attached Node:
 |
|---|
In this example, the end point will execute if the value is greater or equal to 500 (from the function node):
![]()
That's the condition finished at this point, so when we pull everything together, we have the following:
![Node-RED flow with WebSocket Read IO, json, debug, Monitor Input[1], and if (count>=500) nodes](/assets/images/flow-3-7c0dc5e61cbb1ec66dd663806ac689f3.png)
Email Notifications
Adding Email Notifications
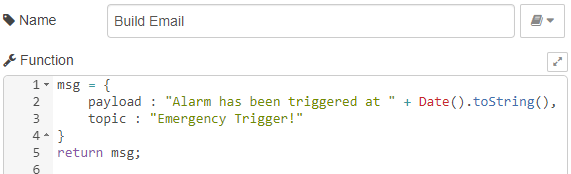
Use another Function Node for building your email.
 |
|---|
In this example, the payload holds the body of the message, and the topic holds the subject of the email being sent. And finally finish it with an Email Node, configured with your email address and settings:
 |
|---|
In this example a Google email has been used, but the email Node can be configured for other and your own domains.
For a Google email to work with Node-RED, you need to go to your account settings, and Enable Less Secure Apps
Testing Email Notifications
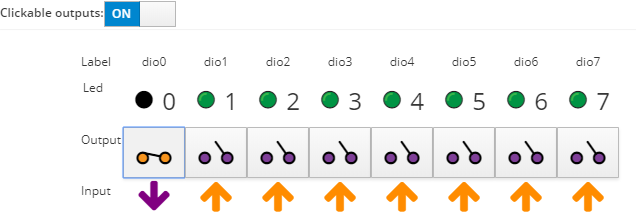
The default logic configuration for the IO lines on a BB-400 is NPN, which means by default, all inputs are pulled high, and signals pull it low (to ground):

To test this new flow is working, first make sure they're all connected like the image above, and deploy it. If you'd like to use the debug tab on the right, move your debug nodes to where you'd like to see the output data.
Without any hardware connected to your IO lines, you can use your BB-400 WebAdmin IO page to manually flip the signals on your BB-400, otherwise, you can now flip the signal you configured in the 'Monitor Input' function node, using your hardware such as a sensor or shorting the input to ground:

When you flip the signal on IO line 0, the debug tab (with the configuration above) shows the bool returned from the 'Monitor Input' function node, and also prints the Email which has been sent out:
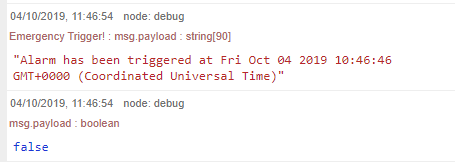
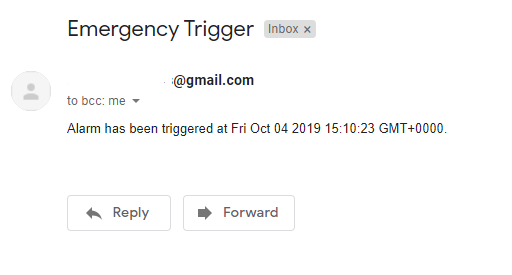
Of course, an email will also be received on the endpoint email address, with the subject and message we wrote inside the 'Build Email' function node:

Twitter Notifications
Adding Twitter Notifications
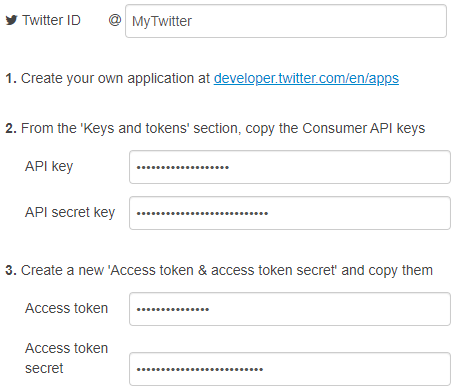
You can also use Node-RED for sending tweets out. To use Twitter via Node-RED, you must own a Twitter developer account, which allows you to create apps and generate API keys, which are fields required by the Twitter Node inside Node-RED.
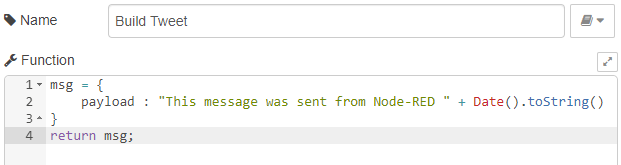
Use another Function Node for building your Tweet:
 |
|---|
In this example, the payload holds the body of the message being tweeted.
And finally finish it with a Twitter Node, configured with your account settings and API keys.
 |
|---|
Testing Twitter Notifications
The default logic configuration for the IO lines on a BB-400 is NPN, which means by default, all inputs are pulled high, and signals pull it low (to ground):
![Complete Node-RED Twitter notification flow with WebSocket IO, json, debug, Monitor Input[2], switch, Build Tweet, and Tweet nodes](/assets/images/twitter-flow-24b1bdf05e415ff36b84518a4558c570.png)
To test this new flow is working, first make sure they're all connected like the image above, and deploy it. If you'd like to use the debug tab on the right, move your debug nodes to where you'd like to see the output data.
Without having to write any kind of script to increase the counts, you can manually change the condition to a much lower value (for example, 20 counts) inside the 'if (count[gt]=1000)' Switch node. You can then use your BB-400 WebAdmin IO page to manually flip the signals on your BB-400, or you can now flip the signal you configured in the 'Monitor Input' function node, using your hardware, such as a sensor or shorting the input to ground:
When you flip the signal on IO line 0, the debug tab (with the configuration above) shows the counts value returned from the 'Monitor Input' function node:

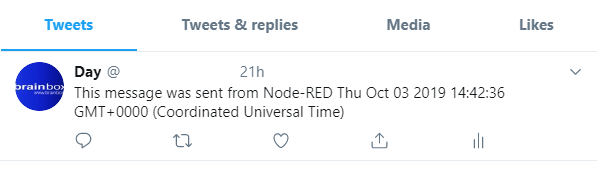
Of course, when triggered, the Tweet will also be posted on the endpoint Twitter account, with the message we wrote inside the 'Build Tweet' function node:
3. Using Python for Push Notifications
Email Notifications
We can also push notifications using Python. Below is a Python program that will send an email and publish a tweet when there is a change in inputs or counts is greater than 1000:
import smtplib, ssl
from time import strftime, gmtime
import websocket
import json
from twython import Twython # sudo pip3 install Twython
def send_email(subject, msg):
"""Sends an email
Arguments:
subject {string} -- Subject of the email
msg {string} -- Body of the email
"""
port = 465
smtp_server = "smtp.gmail.com"
sender_email = "[email protected]"
receiver_email = "[email protected]"
password = "example"
email_msg = 'Subject: {}nn{}'.format(subject, msg)
context = ssl.create_default_context()
with smtplib.SMTP_SSL(smtp_server, port, context=context) as server:
server.login(sender_email, password)
server.sendmail(sender_email, receiver_email, email_msg)
print("Sent email")
def tweet(message):
"""Sends a tweet
Arguments:
message {string} -- Message to tweet
"""
consumer_key = '***************'
consumer_secret = '***************'
access_token = '***************'
access_token_secret = '***************'
twitter = Twython(
consumer_key,
consumer_secret,
access_token,
access_token_secret
)
twitter.update_status(status=message)
print("Tweeted: " + message)
def get_time_now():
"""Returns the current time.
Returns:
string -- date and time
"""
return strftime("%a %b %d %Y %H:%M:%S GMT+0000", gmtime())
def on_open(ws):
print("Connected to WebSocket server")
def on_message(ws, message):
""" This method is called when a new message arrives through the WebSocket.
When message satisfies a condition an email and a tweet are sent.
Arguments:
ws {object} -- WebSocket object
message {object} -- message received from the WebSocket connection
"""
response = json.loads(message)
io_status = response["inputs"][0]
io_counts = response["counts"][1]
if not io_status or io_counts [gt]= 1000:
now = get_time_now()
send_email("Emergency Trigger", "Alarm has been triggered at {}.".format(now))
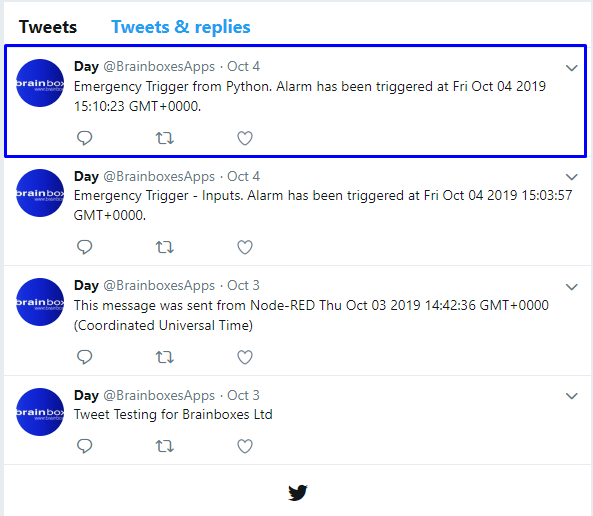
tweet("Emergency Trigger from Python. Alarm has been triggered at {}.".format(now))
def on_error(ws, error):
print("Error occurred: "+ error)
def on_close(ws):
print("##### closed websocket connection #####")
def monitor_inputs():
""" Opens the WebSocket connection and monitors the messages received.
"""
ws_end_point = "ws://0.0.0.0:8989"
ws = websocket.WebSocketApp(ws_end_point,
on_open= on_open,
on_message = on_message,
on_error = on_error,
on_close = on_close)
print("nPress Ctrl+C to exit the program")
ws.run_forever()
ws.close()
if __name__ == "__main__":
monitor_inputs()
When the program is run it opens a WebSocket connection and listens for updates. When a new state is received, it checks the inputs and counts. If the desired condition is met it sends an email and publishes a tweet:
Email notification
Tweet